As a follow up to the Royal Gorgeous, here is the Juanna Be Hopper Juan. The little brother of the HJ, it's designed for the smaller streams and smaller fish that live in them. It still has a good amount of foam and float-ability so it can hang with the big boys, or maybe I should say that it can hold up some big boys! Throw on a Royal Gorgeous and fish some of the smaller pockets and seams and see what happens. You might be surprised!
Tying the Juanna Be Hopper Juan from Juan Ramirez on Vimeo.
This is the little brother to the full grown Hopper Juan. It is designed for early and later in summer when fish have seen all the big hoppers that all the companies tie and sell. It pretty easy to tie, give it a try.
Showing posts with label how to tie foam hoppers. Show all posts
Showing posts with label how to tie foam hoppers. Show all posts
Wednesday, April 20, 2011


Friday, June 12, 2009
The Club Sandwich/Triple Decker Fly


Club Sandwich #12
Hook: #6-12 3xl hook
Body: 3 pieces of 2mm foam glued together and stamped out with a cutter
Thread: 6/0 or UTC 140 Denier
Legs: Tan Rubber Legs barred with marker
Hair: Elk or Deer
Use the thread to form segmentation on this fly. Slit the foam with a razor blade to recess on the hook shank and use super glue applied to thread before doing so to help hold onto the shank. Make sure the segments are even spaced. I start the thread about the 50% point on the hook and work back to the tail of the fly and then back up the shank of the hook making the segments as I go. Form the legs by using three strands at a time and place a knot in two rubber pieces. Tie them in at two separate points or segments. Separate the three strands on both the rear and front legs. Clip out two strands on the rear portion. Pick the best angled leg and remove the other two. On the front legs, I clip both top and bottom strands. Use a bodkin or needle to pierce through the middle portion of the body. Then insert a threader and double over a piece of rubber leg and pull through. Trim to length.
I prefer tying these flies with a hair wing or something on top to make them land hook down.
Here is the video tutorial:
Tying the Club Sandwich in HD from Juan Ramirez on Vimeo.
Here is the video tutorial:
Tying the Club Sandwich in HD from Juan Ramirez on Vimeo.
Friday, May 15, 2009
The Hopper Juan Tying Steps
At last, the blueprint for my Hopper Juan. The Hopper Juan was created in a desire to have a highly visible hopper pattern that covered a few criteria of mine: First, I wanted a pattern that I could call my own; I didn’t want to copy something already out there. Second, it had to look nice. I wanted to create a pattern that was simple and attractive, a reflection of my tying style. Third, it had to float well and be able to hold up a nice chunk of iron and tungsten. Fourth, it had to be high-viz for my clients that have trouble seeing a small duck on the water, and lastly, it had to catch fish and be durable enough to catch a bunch of them. I often fish a hopper dropper most of the year on a variety of different water. The Hopper Juan can be tied in orange, to reflect the bigger salmon flies or used in tan/brown for golden stones.
I have been fishing the HJ, for a few years now and it has been going through the modification process during that time. Many changes have been made, but the final product is what you see here. I make sure to treat each fly with Watershed, even though it is foam. It definitely makes a difference throughout the day as it soaks up less water. I usually follow the HJ with a heavy beadhead of some sort to make sure I offer the fish a second option. I will also follow that nymph with a third fly, usually a smaller, more imitative fly. Depending on seasonal hatches, it could be a BWO, midge or PMD nymph or emerger. John Barr calls this the "bait and switch". Bring them in with the attractor and they take the smaller fly. I like his thinking.
Tie up some HJs and go and fish them this summer. They are really not that complicated to tie and I am very proud of that. Let me know how you like them or let me know some suggestions for the fly. I plan to list some of my other patterns that I tie to drop from the Hopper Juan later down the road. So here it is, the Hopper Juan
Original Hopper Juan
Hook: 2XL such as TMC 5262 or MFC 7026 size 6-10
Thread: UTC 140 denier to match foam
Foam: 2mm foam, cut to shape with chernobyl taper cutter.
Glue: Krazy glue with brush
Underwing: MFC wing material, brown, cut with wing cutter.
Wing: Nature's Spirit early season cow elk
Flash: Krystal flash, pearl or U.V. pearl
Legs: Med. rubber legs, color to match body
High-Vis: MFC Gator Hair
 Layout of materials. I use a Medium* chernobyl cutter for this size fly, a # 8*
*=EDIT
 Foam colors you can use. Mix and match.

Start by making a layer of thread on the hook. Measure the hook gap and pierce through the bottom piece of foam. This is the tapered side.

Position bottom piece of foam and make three wraps to secure. Place a small dab of crazy glue on to hold to hook shank.

Lay top piece of foam in position. Make three wraps to secure. The glue will help hold it together. Make sure the tapered ends of the two foam tips match up.

Make thread wraps to next segment point and tie down bottom piece of foam. Place a small amount of glue to hook shank and foam. Make sure you estimate where you want the segments to be. If you don't, your 3rd and 4th segment will be squished together and look funny.

Continue to make segments using just a dab of glue on each segment. At this segment will be all your hair and additional wraps to finish the fly so don’t overdue it here. Only make enough wraps to secure the foam. The glue will help hold it together.

Make last segment and leave a little room to make a cut and to be able to cover foam with thread.

It is very important that you have micro tip scissors to make a clean, close cut. You will end up with some little “nubs” that you will have to trim and then cover with thread warps to make a clean head.

See the "nubs"? This is why we use the UTC thread. It lays flat if needed and here, we need it to lay flat to cover the nubs.

At this point, I have covered the “nubs” under thread wraps. Notice my frayed thread? This is the only disadvantage of using UTC thread. It important to use UTC 140 though.

At this point, make one wrap over the top of the foam to the first segment.

Montana Fly Co. wing material cut to shape using a wing cutter. This step is optional.

Tie in wing material so it extends just past the back of the foam. Tie in some flash material. I usually use midge pearl krystal flash. On this fly, I used U.V. pearl. Tie in some good cow elk hair that is somewhat stiff. I love good elk hair!

Tie in some legs. I used Hareline’s barred rubber legs here but you can use what ever you want.

Place some glue on the top of the foam where you made a single wrap of thread.

Pull the foam down over the glue and thread wrap. Tie down using only two wraps to secure. The glue will hold it down.
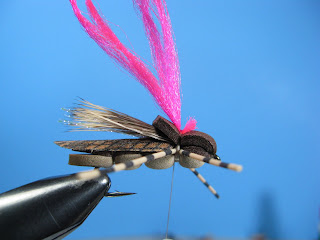
Tie in some hi-vis material. This helps the older generation to pick up this fly on the water easier. It is optional, but I tie it on all my flies and I am still in the younger generation. Leave some of the material sticking out the front as in the photo. This helps lock it in there and is harder for it to fall out.

Trim to finish up and make sure all your legs are even and your body is straight and tight.

View from the back and top. Nice wing.

View from the front.

Fish's view.
I have been fishing the HJ, for a few years now and it has been going through the modification process during that time. Many changes have been made, but the final product is what you see here. I make sure to treat each fly with Watershed, even though it is foam. It definitely makes a difference throughout the day as it soaks up less water. I usually follow the HJ with a heavy beadhead of some sort to make sure I offer the fish a second option. I will also follow that nymph with a third fly, usually a smaller, more imitative fly. Depending on seasonal hatches, it could be a BWO, midge or PMD nymph or emerger. John Barr calls this the "bait and switch". Bring them in with the attractor and they take the smaller fly. I like his thinking.
Tie up some HJs and go and fish them this summer. They are really not that complicated to tie and I am very proud of that. Let me know how you like them or let me know some suggestions for the fly. I plan to list some of my other patterns that I tie to drop from the Hopper Juan later down the road. So here it is, the Hopper Juan
Original Hopper Juan
Hook: 2XL such as TMC 5262 or MFC 7026 size 6-10
Thread: UTC 140 denier to match foam
Foam: 2mm foam, cut to shape with chernobyl taper cutter.
Glue: Krazy glue with brush
Underwing: MFC wing material, brown, cut with wing cutter.
Wing: Nature's Spirit early season cow elk
Flash: Krystal flash, pearl or U.V. pearl
Legs: Med. rubber legs, color to match body
High-Vis: MFC Gator Hair

*=EDIT


Start by making a layer of thread on the hook. Measure the hook gap and pierce through the bottom piece of foam. This is the tapered side.

Position bottom piece of foam and make three wraps to secure. Place a small dab of crazy glue on to hold to hook shank.

Lay top piece of foam in position. Make three wraps to secure. The glue will help hold it together. Make sure the tapered ends of the two foam tips match up.

Make thread wraps to next segment point and tie down bottom piece of foam. Place a small amount of glue to hook shank and foam. Make sure you estimate where you want the segments to be. If you don't, your 3rd and 4th segment will be squished together and look funny.

Continue to make segments using just a dab of glue on each segment. At this segment will be all your hair and additional wraps to finish the fly so don’t overdue it here. Only make enough wraps to secure the foam. The glue will help hold it together.

Make last segment and leave a little room to make a cut and to be able to cover foam with thread.

It is very important that you have micro tip scissors to make a clean, close cut. You will end up with some little “nubs” that you will have to trim and then cover with thread warps to make a clean head.

See the "nubs"? This is why we use the UTC thread. It lays flat if needed and here, we need it to lay flat to cover the nubs.

At this point, I have covered the “nubs” under thread wraps. Notice my frayed thread? This is the only disadvantage of using UTC thread. It important to use UTC 140 though.

At this point, make one wrap over the top of the foam to the first segment.

Montana Fly Co. wing material cut to shape using a wing cutter. This step is optional.

Tie in wing material so it extends just past the back of the foam. Tie in some flash material. I usually use midge pearl krystal flash. On this fly, I used U.V. pearl. Tie in some good cow elk hair that is somewhat stiff. I love good elk hair!

Tie in some legs. I used Hareline’s barred rubber legs here but you can use what ever you want.

Place some glue on the top of the foam where you made a single wrap of thread.

Pull the foam down over the glue and thread wrap. Tie down using only two wraps to secure. The glue will hold it down.

Tie in some hi-vis material. This helps the older generation to pick up this fly on the water easier. It is optional, but I tie it on all my flies and I am still in the younger generation. Leave some of the material sticking out the front as in the photo. This helps lock it in there and is harder for it to fall out.

Trim to finish up and make sure all your legs are even and your body is straight and tight.

View from the back and top. Nice wing.

View from the front.

Fish's view.
Make sure to check out the HD tying video!

Subscribe to:
Posts (Atom)


